Slow-roasted pork belly with crackling skin
This slow-roasted pork belly is one of my favorite danish dishes. It just always tastes good, especially the crispy skin. It is typically served during Christmas, but many people also have it for dinner.
Here in Denmark, December is a high season for roasted pork belly. It is a must on the Christmas lunch table or for Christmas dinner and red cabbage and browned potatoes. So we usually make our roasted pork belly in the oven and, at the same time, get a delicious sauce out of it!
Tips on how to get a very delicious, juicy, and crispy roast pork
You will need:
Here in Denmark, December is a high season for roasted pork belly. It is a must on the Christmas lunch table or for Christmas dinner and red cabbage and browned potatoes. So we usually make our roasted pork belly in the oven and, at the same time, get a delicious sauce out of it!
Tips on how to get a very delicious, juicy, and crispy roast pork
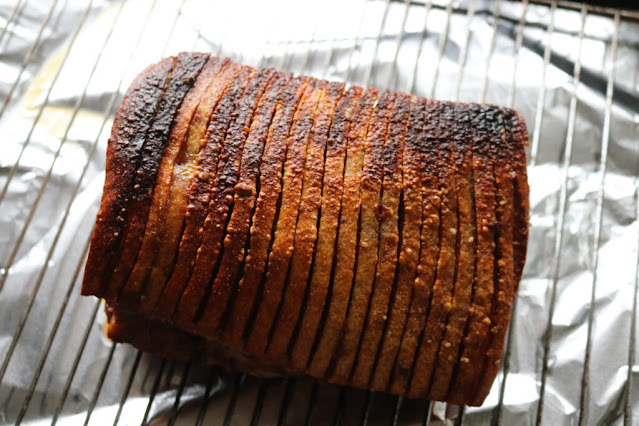
- Cut deep grooves in the rind but do not go down to the actual meat.
- Add plenty of salt on the rind and down in-between the grooves. If you do not add enough salt, you risk getting nice and crisp skin.
- Here is our recipe for slow-roasted pork belly. We like to cook the pork belly as it gets super tender and some of the fat melts away during roasting. I learned this procedure from my mother-in-law.
You will need:
- 12 kg pork belly with skin on (and scored all the way down just to before the flesh in 1cm apart – ask the butcher to do this)
- rock salt
- 8 bay leaves (optional)
- olive oil (optional)
- water
- An hour or two before cooking, remove the pork from the fridge to bring it to room temperature. Wipe the roast off, especially the crust – wet crusts do not give crispy crusts. Check if the rind is cut all the way down to the meat. If not, use a sharp knife and cut long deep grooves in the pork roast’s skin. Make sure to make deep grooves but not cut into the actual meat. Again, it is important to get good crispy crusts.
- Now let the roast stand and dry for a few hours, preferably overnight, in the fridge.
- Preheat the oven to 180C/350F (with a fan).
- Once the pork is dry, place it on a rack over a baking pan. Rub the skin with salt. Make sure to get in all the cuts on the skin. This helps to get crispy skin.
- Pour some water into the bottom of the pan before roasting the pork. You may need to replenish it during cooking. You can use the drippings for making the gravy.
- Insert the meat thermometer into the meat (find the thickest part). Roast the pork or flæskesteg for 1.5 hours to 2 hours.
- If you have a meat thermometer, it should read 77C or 170F. You may need to adjust the cooking time depending on the weight of the pork roast. Rest assured, the pork will continue to cook slightly after it’s removed from the oven.
- If the pork rind or crackling is soft, change the oven function to broil and let the flæskesteg stay in the oven for 5 minutes. Keep an eye on the pork and be careful not to burn it.
- Please turn off the oven, open the oven door a little, then let the flæskesteg in the oven until you are ready to serve it. Don’t cover the roast as any steam coming from the resting pork will soften the skin, which will have crisped into “cracklings.” And you don’t want to lose that!
- Slice the flæskesteg or pork roast into thin slices and cook potatoes and gravy.


Comments
Post a Comment